
Setting Grayscale Mode
These instructions are for converting color to B/W for the back of a 4/1 layout only. If you are printing a 4/4 card, please refer to the specs for submitting specs for submitting CMYK files.
How to Set Color on the Back Using Photoshop

Save as a TIFF.
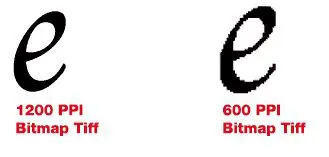
PLEASE NOTE: If your artwork is solid black on a white background like text (no shades of gray), you should save as a bitmap tiff at the resolution of 1200 pixels per inch (ppi). Here’s how:
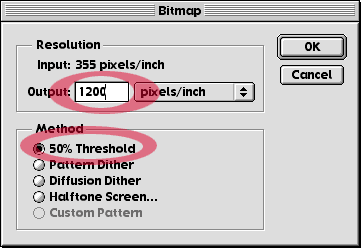
- Be sure you have created your artwork at 1200 ppi. Go to Mode > Bitmap (You may need to convert to Grayscale and then to Bitmap).

- Set the resolution to 1200 ppi and the Method to 50% Threshold.
- Again, a bitmap TIFF should be used when there is only solid black and white areas in the image. If there are any shades of gray whatsoever, the file should be saved as Grayscale.

How to Set Color on the Back Using Illustrator
To check for images you have placed into Illustrator using the “Place” function, you will need Photoshop.
To be sure that all your vector objects are all Grayscale, you will first need to select all (Control-A Windows, Command-A Mac), and then go to Filter > Colors > Convert to Grayscale.
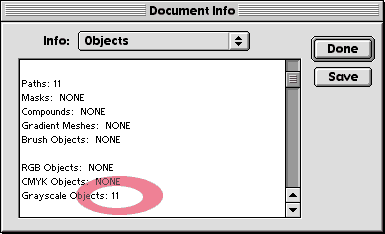
To double check that all your vector objects have been converted to Grayscale, go to File > Document Info (you may need to select all first) and pull down on the small options menu on the Document Info Palette to “Options.”
In this example all the objects have been successfully converted to Grayscale.
Please note that gradients will not convert using the Convert to Grayscale Filter. You should probably create your gradients in a raster editing program like Photoshop and place them into Illustrator.
How to Set Color on the Back Using InDesign
To check for TIFFs you have placed into InDesign using the “Place” function, you will need Photoshop. To check for EPS files placed into InDesign, you will need either Illustrator, FreeHand.)
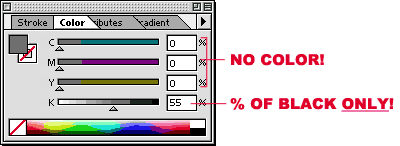
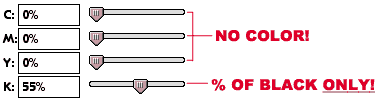
To check for InDesign elements, you will have to select them individually and check the Color Palette. If the selected element is in color, simply change it to Grayscale, by only applying the black (K) channel to it (C, M, and Y should be 0%).
How to Set Color on the Back Using QuarkXPress
To check for TIFFs you have placed into Quark using the “Get Picture” function, you will need Photoshop. To check for EPS files placed into Quark, you will need either Illustrator or FreeHand.)
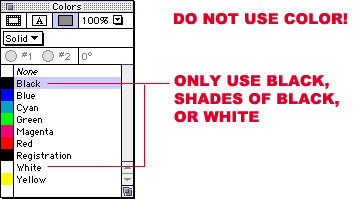
To check for Quark elements, you will have to select individual elements to see what color they are assigned in the color palette.
In this example, be sure not to use any color swatches.
You may have created a custom color. It is best that you go to Edit / Colors to convert these to grayscale by only using the black (K) channel (C,M,and Y should be at 0%).
Need more help?
Find detailed information about setting up your files.
Approval Method
Bitmap Resolution
Border
Color Overview
Color Profiles
Color Quality
Cropping
Digital Camera
Digital Camera Media
Duplicate List Records
File Compression
Help us achieve correct color
ICC Printer Profiles
JPEG Compression
List FAQ
Mailing List Formats & Specifications
Monitor Calibration
Screen and Print Resolution
Setting Color Modes
Setting Grayscale Mode
Standard Font Set
Word Count