File Setup Instructions for Photoshop
Step 1 – Product Dimensions
- Photoshop templates are available here.
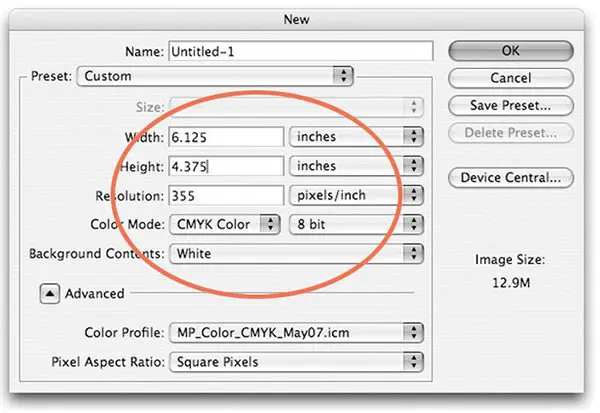
- Or if you want to start a new document, go to File -> New -> Document.
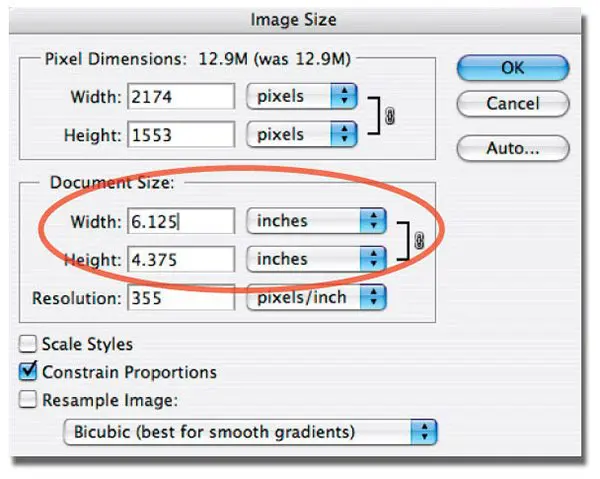
- When you start a new document, be sure the final size of the document includes bleed dimensions.
- Use inches for the Height and Width measurements
- Be sure to Constrain Proportions
- Note that 1/16″ (.0625 of an inch) will be trimmed off each side of your product (example: a Standard Postcard 4.375″ x 6.125″ will trim to 4.25″ x 6″).
* For easy visibility of document size, hold option key while clicking on bottom information bar of window.

Step 2 – Bleed Edge, Trim Edge & Safe Zone
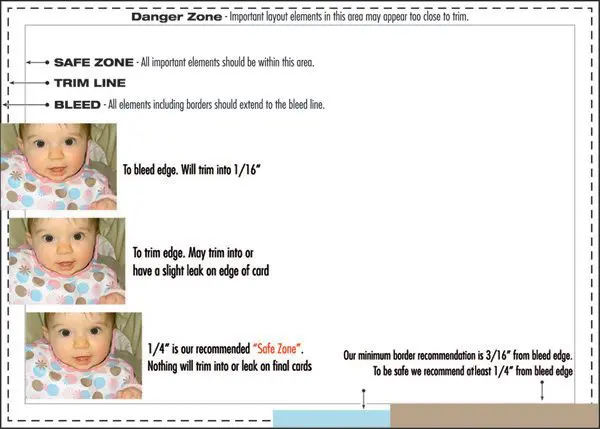
- Our Photoshop templates include guidelines for bleed, trim and safe zone. Download here.
- Borders should be .25″ thick from the bleed edge (3/16″ or .1875″ from trim). 3/16″ is minimum border recommended.
- 1/16″ (.0625 of an inch) will be trimmed off each side of your product (example: a Standard Postcard 4.375″ x 6.125″ will trim to 4.25″ x 6″).
Caution:
- Elements too close to or over the trim edge may trim into or leave a visible leak.
- Borders thinner than 3/16″ from bleed edge may appear uneven when trimmed.
- Images bordering the trim edge may cause a leak on final cards. Images should “bleed” off the page.
Step 3- Color Mode & Color Profiles
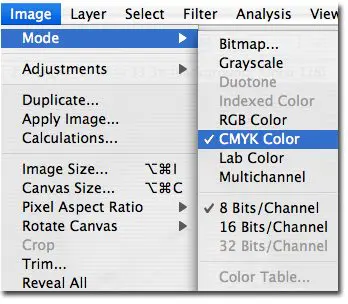
- Start your layout using a document in CMYK color space. Go to Image -> Mode -> CMYK to convert document color space.
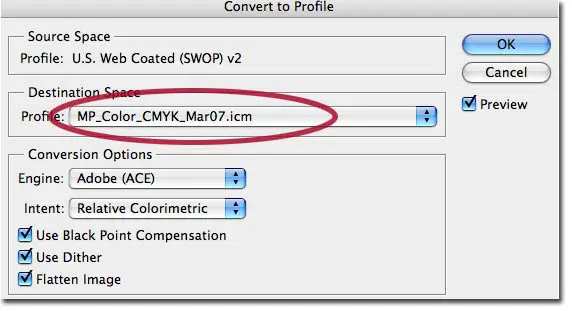
- Color Manage your files with MP Printer Profiles. Go to Edit -> Convert to Profile and select our most current profile.
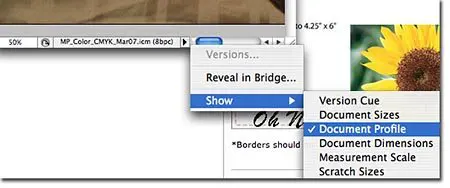
* For easy visibility of profile being used, select triangle in bottom portion of image window and set to Show -> Document Profile.
Additional Color Options:
- Send us a Color Sample that resembles your color expectations and we will do a color review/comparison.
- You can order a Color Proof $55 (adds one day)
Step 4 – Image Quality & Resolution
Good image quality and color makes a big difference when your order is printed.
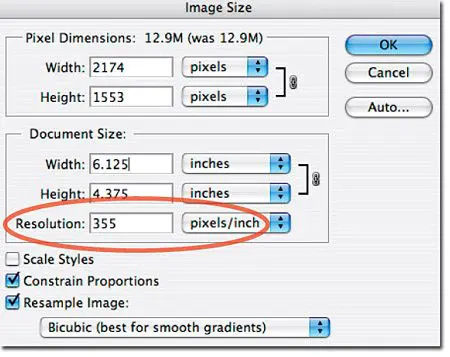
- Go to -> Image -> Image Size and check for image resolution.
- We recommend 355 PPI for all images and 1200 PPI for all bitmap images.
- When reading resolution be sure to have pixels/inches selected.
Caution:
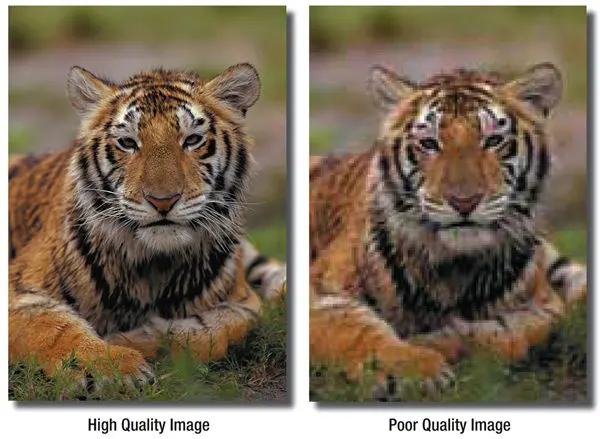
- Images or documents that have a lower resolution can not be fixed by adding pixels (interpolation). This will cause your images to appear pixelated and blurry. Start your new documents at 355ppi and be sure you start with images that already have a higher quality resolution.
- Images may be 355 PPI but the dimensions may be smaller than the intended card size. Be sure the resolution is still at least 355ppi once enlarged to fit postcard dimensions.
To prevent poor quality images your file(s) should meet some basic standards of quality and color:
-
-
- Resolution:
355 PPI (pixels per inch)
1,200 PPI for bitmap (B/W) TIFFs - Image Quality:
JPEG Compression
Digital Cameras - Frontside Color: CMYK
Also see our Monitor Calibration and Printing Profiles - Backside Color: CMYK (4/4), Grayscale or B/W (4/1)
- Resolution:
-
Additional Color Options:
-
- Send us a Color Sample that resembles your color expectations and we will do a color review/comparison.
- You can order a Color Proof $55 (adds one day)
Step 5 – “Rich” Black Values
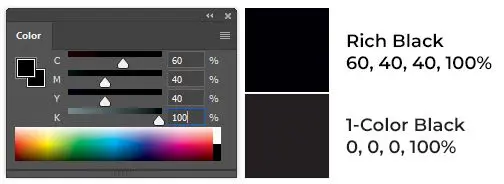
In order for color side black borders, headlines, and text to appear dark and saturated (“rich”), you will need to set your CMYK (Cyan, Magenta, Yellow, and Black) values accordingly:
C = 60%
M = 40%
Y = 40%
K = 100%
Caution:
Black values that appear the same onscreen may actually be vastly different when printed:
Step 6 – Flattening Image
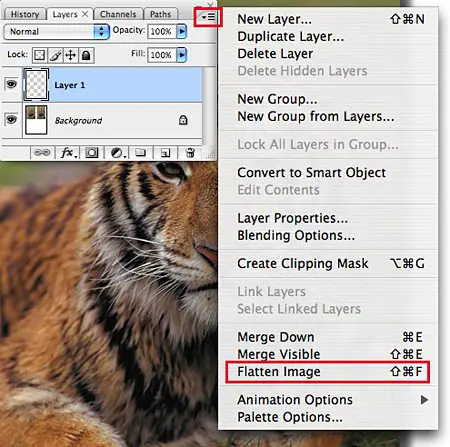
Please flatten your image (remove all layers) by using the fly-out menu in the layers palette and choosing “Flatten Image.”
(Or go to Layer -> Flatten Image.)
Please Note: Failure to flatten your image prior to saving to PDF may result in text layers losing their fonts or vector layers dropping out on press.
Step 7 – Deleting Alpha Channels and Paths
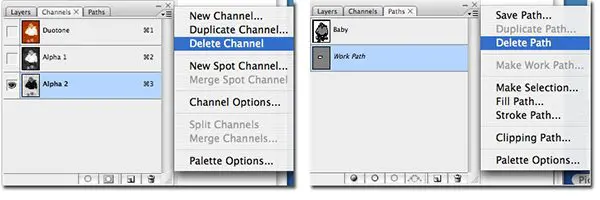
Please delete the additional channels and paths created by the user by selecting each tab -> fly-out menu -> Delete.
Please Note: Failure to delete Channels and Paths prior to saving to PDF may result in unwanted results.
Step 8 – U.S. Postal Regulations
If you plan on mailing your postcards (or having us mail them for you), your layout must meet U.S. Postal Regulations.


